I want to start learning about IPv6 so I went back to using pfSense as my router. While my Airport Extreme worked with IPv6 it masked a lot of the nuts and bolts behind a simple interface. Good for 99% of the time and easy to get going, but not if I wanted to learn.
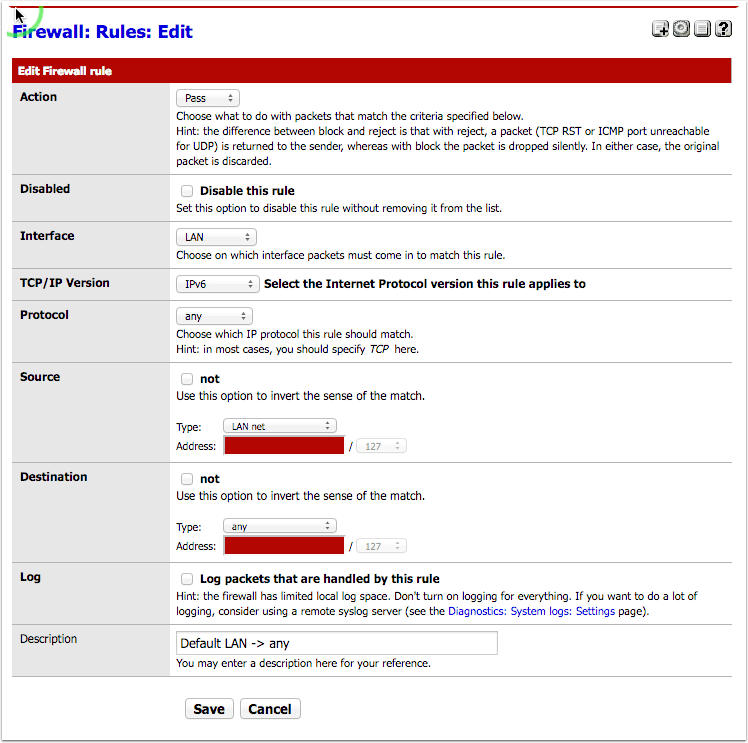
It was fairly straight-forward to get an IPv6 address. But once I got the address my browser tests were all failing. The desktop had a perfectly acceptable IP address using Comcast’s prefix and seemed fine. The light-bulb went off when I could ping ipv6.google.com from the WAN interface (using the ping widget in pfSense) but not from the LAN interface or my Mac desktop. Firewall! So the last step in this precess is to set up a Firewall rule to allow all outgoing IPv6 traffic from my LAN interface. The complete process was as follows:
On your own:
Your ISP and cable modem will need to support native IPv6. Comcast seems to support it nationwide although there may be exceptions (Comcast seems to have moved their IPv6 documentation which used to be at www.comcast6.net). I think all DOCSIS 3 modems will support IPv6. My modem is a Motorola SB6121.
I did this with pfSense version 2.1.4-RELEASE (i386). An update was released as I was working on this so this isn’t the latest version, but I did’t want to change versions in the middle of my work. I did upgrade to 2.1.5 after enabling IPv6 and there weren’t any IPv6 issues.)
In pfSense, go to the System -> Advanced -> Networking Tab and verify that “Allow IPv6” is enabled. (Mine already was, but I’m not sure of the default.)

In pfSense, go to Interfaces -> WAN and select DHCP6 as the “IPv6 Configuration Type” (Figure 2).

The DHCP6 Client Configuration Panel will appear. Select 64 as the “DHCPv6 Prefix Delegation size” (Figure 3).

- (If you run multiple subnets in your house or business Comcast seems to support a PD of 56 but I haven’t tested it.) Save the changes.
- In pfSense, go to Interfaces -> LAN and select Track Interface“ as the ”IPv6 Configuration Type“ (Figure 4).

The ”Track IPv6 Interface“ section will appear. Select WAN and the IPv6 Interface and ”0“ as the ”IPv6 Prefix ID” (Figure 05).

- Save the changes.
- In pfSense, go to Firewall -> Rules and create the following LAN rule (Figure 6).

- Reboot pfSense.
- Reboot clients if they already had IPv6 enabled, otherwise enable IPv6 on the clients.
After this I scored 10/10 on Test your IPv6. with the only issue being that my browsers prefer IPv4 over v6, but that’s not a pfSense issue. I could reach IPv6 only sites such as ipv6.google.com. Now it’s time to start going through other apps and see if they use IPv6. Have you enabled IPv6 yet?